กระทู้เมื่อเร็วๆ นี้
KM KPN | แหล่งเรียนรู้ โรงพยาบาลกรงปินัง

กระทู้เมื่อเร็วๆ นี้

หน้า: 1 [2] 3 4 ... 10
11
เครื่องเสมือน : Virtual Machine & Containner / [Proxmox] วิธีเอา pop up Subscription” Notification Proxmox ออกเวลา Login
« กระทู้ล่าสุด โดย newaiman เมื่อ พฤศจิกายน 08, 2024, 08:28:35 pm »
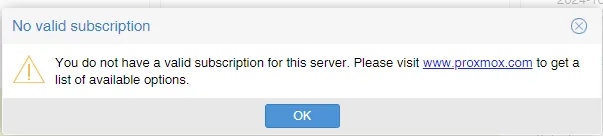
เราจะแก้ไขไฟล์ proxmoxlib.js โดยตำแหน่งที่ตั้งของไฟล์ "/usr/share/javascript/proxmox-widget-toolkit/proxmoxlib.js"



โค๊ด: [Select]
cd /usr/share/javascript/proxmox-widget-toolkit/
ทำการ สำรองไฟล์ ไฟล์ ไว้ก่อน
โค๊ด: [Select]
cp proxmoxlib.js proxmoxlib.js-bk


ทำการเปลี่ยนค่า
จาก
Change the following:
if (res === null || res === undefined || !res || res

        .data.status.toLowerCase() !== ‘active’) {
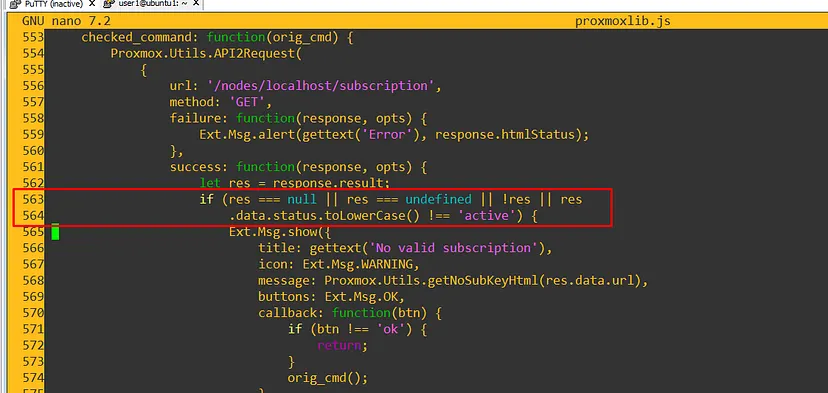

เป็น
if (false) {
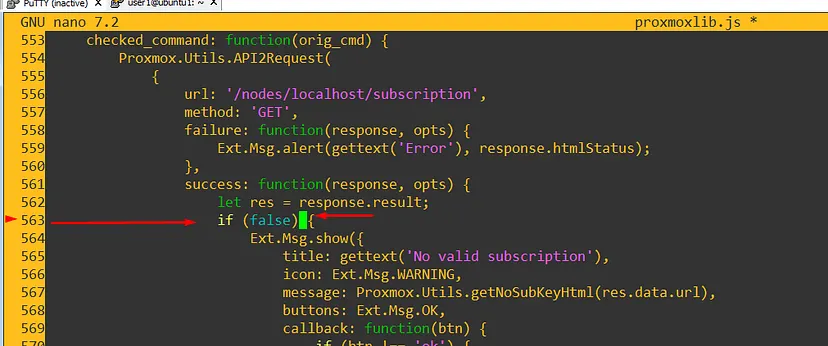

save and exit

ทำการ Resstart service
#systemctl restart pveproxy


ทดสอบ Login เข้าใหม่ มันจะไม่แสดง หน้า Error No Valid Subscription

12
เครื่องเสมือน : Virtual Machine & Containner / [Proxmox] อธิบายเกี่ยวกับ Network ของ Proxmox VE
« กระทู้ล่าสุด โดย newaiman เมื่อ พฤศจิกายน 06, 2024, 10:37:20 pm »
[Proxmox] คำศัพท์หรือคำอธิบายของ Proxmox VE

ด้าน Network

Linux Bridge คือ

Linux Bond คือ การมัดรวมหลายๆ interface เข้าด้วยกัน คล้ายๆ NIC Teamming บน windows หรือ Link Aggregation ซึ่งจะช่วยในการทำ Fault-tolerance และเพิ่ม Performance


คำสั่ง restart network
โค๊ด: [Select]
systemctl restart networking.service
คำสั่ง down network
โค๊ด: [Select]
ifdown ens33
คำสั่ง up network
โค๊ด: [Select]
ifup ens33
13
เครื่องเสมือน : Virtual Machine & Containner / [Proxmox] รวมคำสั่งต่างๆ Proxmox VE ที่ใช้งานบ่อย
« กระทู้ล่าสุด โดย newaiman เมื่อ พฤศจิกายน 04, 2024, 07:58:17 pm »
คำสั่งเกี่ยวกับ Disk Proxmox

คำสั่ง :
โค๊ด: [Select]
lsblkอธิบาย : เป็นคำสั่งแสดงจำนวน disk บน proxmox

คำสั่ง :
โค๊ด: [Select]
df -hTอธิบาย : เป็นคำสั่งแสดงจำนวน Partition บน proxmox

คำสั่ง :
โค๊ด: [Select]
vgsอธิบาย : เป็นคำสั่งแสดง volume group

คำสั่ง :
โค๊ด: [Select]
pvs
คำสั่ง :
โค๊ด: [Select]
lvsอธิบาย : เป็นคำสั่งแสดง logical volume

คำสั่ง :
โค๊ด: [Select]
pvcreate /dev/sdhอธิบาย : เป็นคำสั่งสร้าง physical volume จาก disk ชื่อ sdh ซึ่งค้นหาชื่อโดยคำสั่ง = lsblk

คำสั่ง :
โค๊ด: [Select]
vgextend LV3-Thin /dev/sdhอธิบาย : เป็นคำสั่งขยาย disk ของ LV3-Thin จาก sdh

คำสั่ง :
โค๊ด: [Select]
lvextend -l +100%Free LV3-Thin/LV3-Thinอธิบาย : เป็นคำสั่งขยาย LV3-Thin ให้ 100% ของ disk ที่เหลือ
14
ระบบปฏิบัติการ Linux / วิธีติดตั้ง Google authenticator บน Centos/Ubuntu
« กระทู้ล่าสุด โดย newaiman เมื่อ ตุลาคม 22, 2024, 07:13:08 pm »
1. เพิ่ม the EPEL  repo
โค๊ด: [Select]
yum install https://dl.fedoraproject.org/pub/epel/epel-release-latest-7.noarch.rpm
2. ติดตั้ง Google Authenticator
โค๊ด: [Select]
yum install google-authenticator สำหรับ cent os
โค๊ด: [Select]
apt install libpam-google-authenticator สำหรับ ubuntu

3. ตั้งค่า Google Authen
โค๊ด: [Select]
google-authenticator
4. หลังจากนั้นตั้งค่า ตามคำถาม
อ้างถึง
Do you want authentication tokens to be time-based (y/n) y

Do you want me to update your "/root/.google_authenticator" file? (y/n) y

Do you want to disallow multiple uses of the same authentication token? This restricts you to one login about every 30s, but it increases your chances to notice or even prevent man-in-the-middle attacks (y/n) y


By default, a new token is generated every 30 seconds by the mobile app.

In order to compensate for possible time-skew between the client and the server,we allow an extra token before and after the current time. This allows for a time skew of up to 30 seconds between authentication server and client. If you experience problems with poor time synchronization, you can increase the window from its default size of 3 permitted codes (one previous code, the current code, the next code) to 17 permitted codes (the 8 previous codes, the current code, and the 8 next codes). This will permit for a time skew of up to 4 minutes between client and server.

Do you want to do so? (y/n) y


If the computer that you are logging into isn't hardened against brute-force login attempts, you can enable rate-limiting for the authentication module. By default, this limits attackers to no more than 3 login attempts every 30s.

Do you want to enable rate-limiting? (y/n) y
15
ระบบปฏิบัติการ Linux / ตั้งค่า Time Zone สำหรับ Ubuntu 20.04 LTS
« กระทู้ล่าสุด โดย newaiman เมื่อ ตุลาคม 20, 2024, 12:35:36 pm »

1. แสดงรายละเอียด OS (Operating System)
โค๊ด: [Select]
lsb_release -a

2. ดูวัน/เวลาปัจจุบันก่อน Set Time Zone
โค๊ด: [Select]
date

3. ดูว่าปัจจุบันเครื่องใช้ Time Zone อะไร
โค๊ด: [Select]
timedatectl

4. ดูว่าเราสามารถเปลี่ยน Time Zone เป็นอะไรได้บ้าง
โค๊ด: [Select]
timedatectl list-timezones

5. เปลี่ยน Time Zone ตามที่อยากจะให้เป็น
เช่น ต้องการเปลี่ยนจาก UTC ไปเป็น Asia/Bangkok (ใช้ Time Zone ประเทศไทย)
โค๊ด: [Select]
timedatectl set-timezone Asia/Bangkok

6. ตรวจสอบ Time Zone เครื่องอีกครั้ง
โค๊ด: [Select]
timedatectl

7. ดูวัน/เวลาปัจจุบันหลัง Set Time Zone
โค๊ด: [Select]
date


ข้อสังเกต
จะเห็นว่า วัน/เวลาถูกเปลี่ยน
- จาก Wed Oct 28 04:00:13 UTC 2020
- ไปเป็น Wed Oct 28 11:07:13 +07 2020
ซึ่งจะถูกบวกเพิ่มไปอีก 7 ชั่วโมง (UTC + 7) ซึ่งก็คือ วัน/เวลา ปัจจุบันของประเทศไทย นั่นเอง


source : https://www.jittagornp.me/blog/set-timezone-for-ubuntu20.04/
16
ระบบปฏิบัติการ Linux / รวมคำสั่ง Linux Distro RHEL 8
« กระทู้ล่าสุด โดย newaiman เมื่อ สิงหาคม 29, 2024, 01:54:18 pm »
---
17
เครื่องเสมือน : Virtual Machine & Containner / [ESXi] เวลา Start VM ขึ้น Advanced Vector Extensions 512 Byte
« กระทู้ล่าสุด โดย newaiman เมื่อ สิงหาคม 20, 2024, 11:01:32 am »
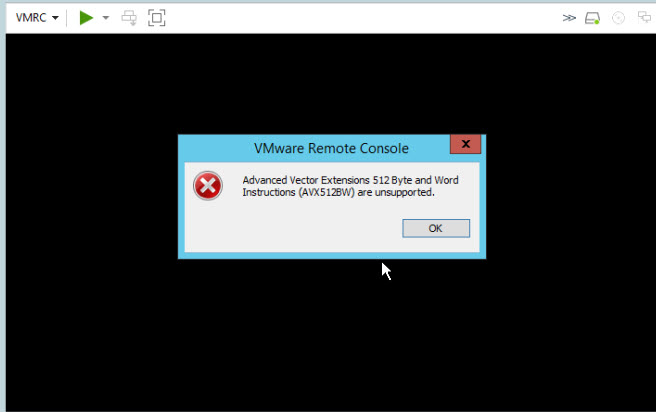
เวลาเราทำ Replication VM ไปยัง Host ที่มี Hardware ที่ต่างรุ่น ต่างยี่ห้อกับ Origin Host ที่เราทำการ Replicate เมื่อเราจะทำการ Start VM ที่ อยู่ใน Host ปลายทาง จะขึ้น Error ว่า "Advanced Vector Extensions 512 Byte and Word Instructions (AVX512BW) are unsupported."


วิธีแก้ไข

เปิด Enhanced vMotion Compatibility (EVC)


1. คลิกที่แทบ Host แล้วดู รหัส CPU ของ Host ปลายทาง


2. เข้าเว็บไปเช็ค https://www.vmware.com/resources/compatibility/search.php (ตามรูปข้างล่าง)


3. จากนั้นไปตั้งค่า EVC Mode ที่ Host (ตามรูปข้างล่าง)

18
ระบบปฏิบัติการ Linux / รวมคำสั่ง postgresql บน CentOS8 & AlmaLinux8 & RockyLinux8
« กระทู้ล่าสุด โดย newaiman เมื่อ สิงหาคม 09, 2024, 09:46:10 am »
คำสั่ง เช็คสถานะการทำงานของฐานข้อมูล PosgreSQL เวอร์ชั่น 13
โค๊ด: [Select]
systemctl status postgresql-13
คำสั่ง restart service PosgreSQL เวอร์ชั่น 13
โค๊ด: [Select]
systemctl restart postgresql-13
คำสั่ง stop service PosgreSQL เวอร์ชั่น 13
โค๊ด: [Select]
systemctl stop postgresql-13
คำสั่ง check version PG
โค๊ด: [Select]
psql --version
คำสั่ง Dump PostgreSQL แบบ .SQL
โค๊ด: [Select]
pg_dump  -U kpn kpnlogdb > /var/backup-db/kpnlogdb-test.sql
คำสั่ง Dump PostgreSQL แบบ .SQL.gz
โค๊ด: [Select]
time pg_dump  -U kpn kpnhos | gzip > /var/backup-db/kpnhos-test.sql.gz
19
Cause Issue / vCenter : เข้าหน้าเว็บ vCenter ขึ้น HTTP Status 500 — Internal Server Error
« กระทู้ล่าสุด โดย newaiman เมื่อ มีนาคม 20, 2024, 01:39:42 am »

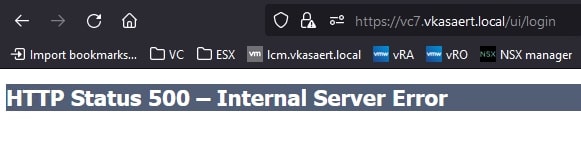
Case : เวลาเราเข้าหน้าเว็บ vCenter ที่เป็น https://IP-Address/ui/ จะขึ้นขึ้น HTTP Status 500 — Internal Server Error ไม่สามารถเข้าไปจัดการ hosts ที่อยู่ใน vcenter ได้

How To Fix : รันคำสั่ง command ตามรายการข้างล่าง

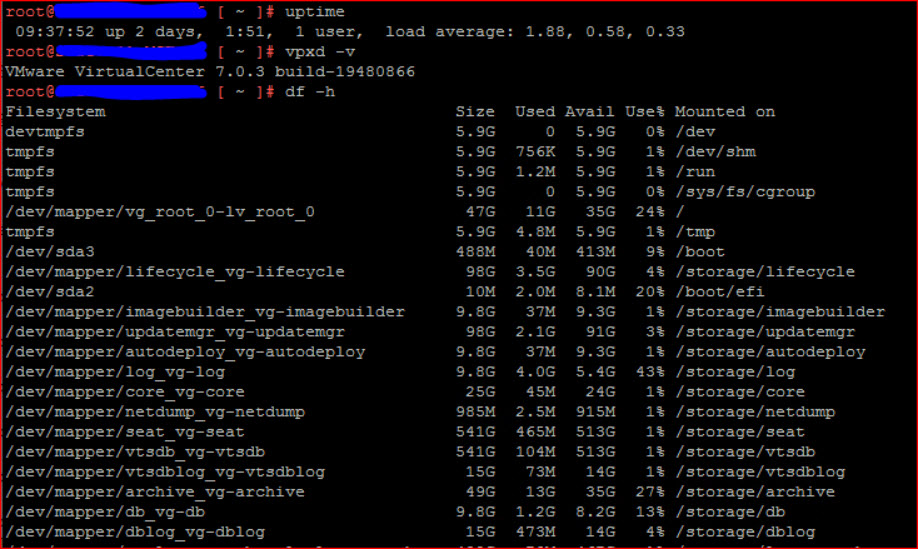
1. เพื่อเช็คค่าต่างๆ
โค๊ด: [Select]
uptime
โค๊ด: [Select]
vpxd -v
โค๊ด: [Select]
df -h

2. เช็คสถานะของ service ต่างๆ ว่ามีรายการไหนทำงานอยู่
โค๊ด: [Select]
service-control --status --all

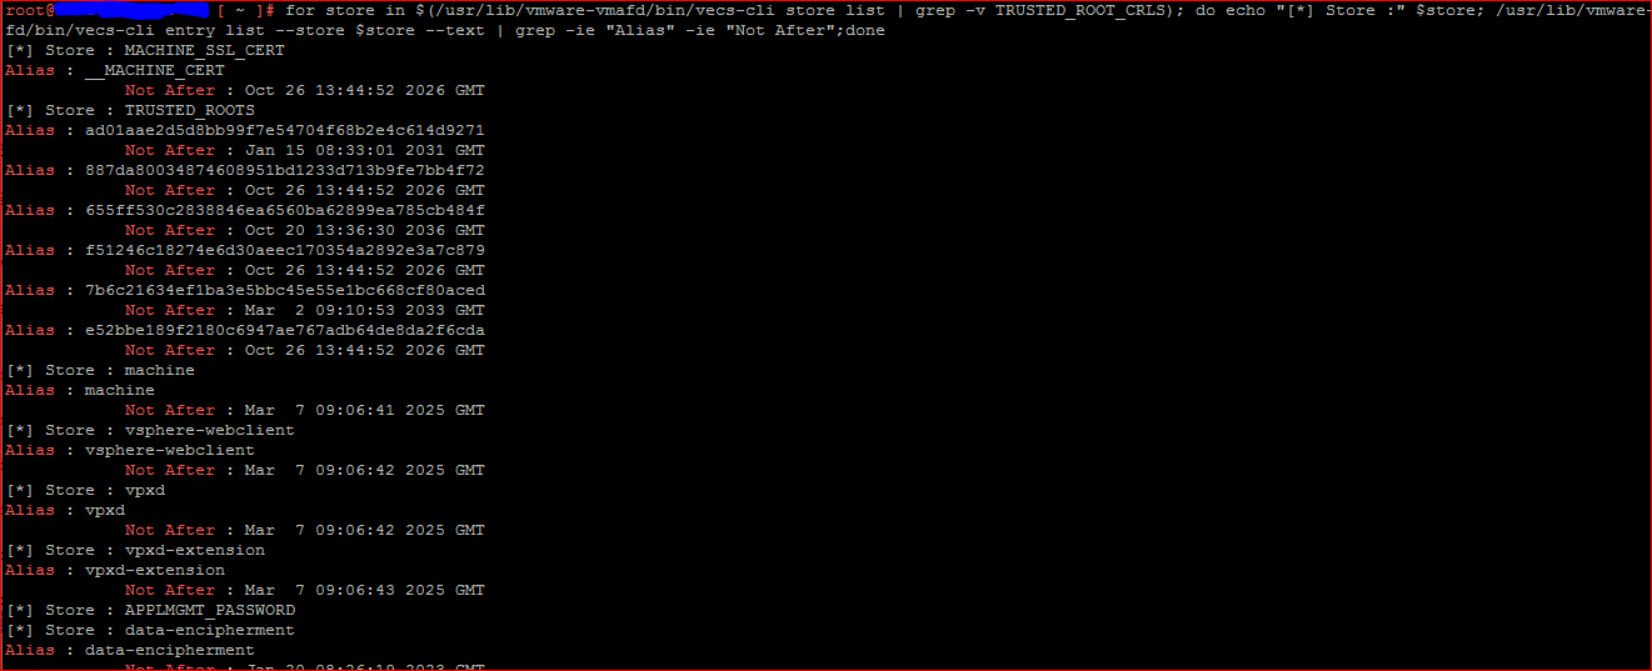
3. เช็ค certificate trust ต่างๆ
โค๊ด: [Select]
for store in $(/usr/lib/vmware-vmafd/bin/vecs-cli store list | grep -v TRUSTED_ROOT_CRLS); do echo "[*] Store :" $store; /usr/lib/vmware-vmafd/bin/vecs-cli entry list --store $store --text | grep -ie "Alias" -ie "Not After";done


4. เพื่อเป็นการจัดการ certificate ที่อยู่ใน vcsa
โค๊ด: [Select]
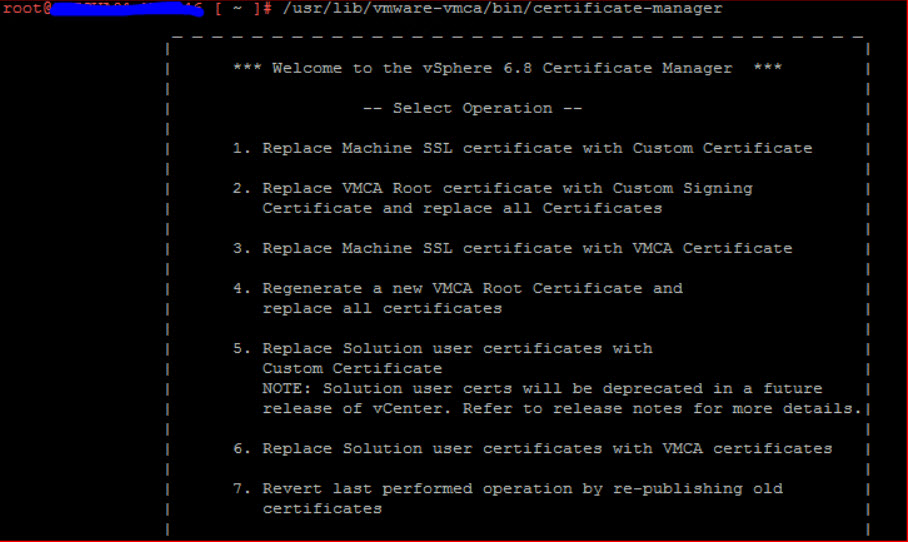
/usr/lib/vmware-vmca/bin/certificate-manager

จากนั้นให้เลือกว่าจะทำการ reset certificate ไหนบ้าง **แนะนำเลือก 8 เพื่อ reset certificates ทั้งหมด
> เลือก 8 เพื่อ reset all certificates.
> เลือก 6 เพื่อ  reset for solution certificates.

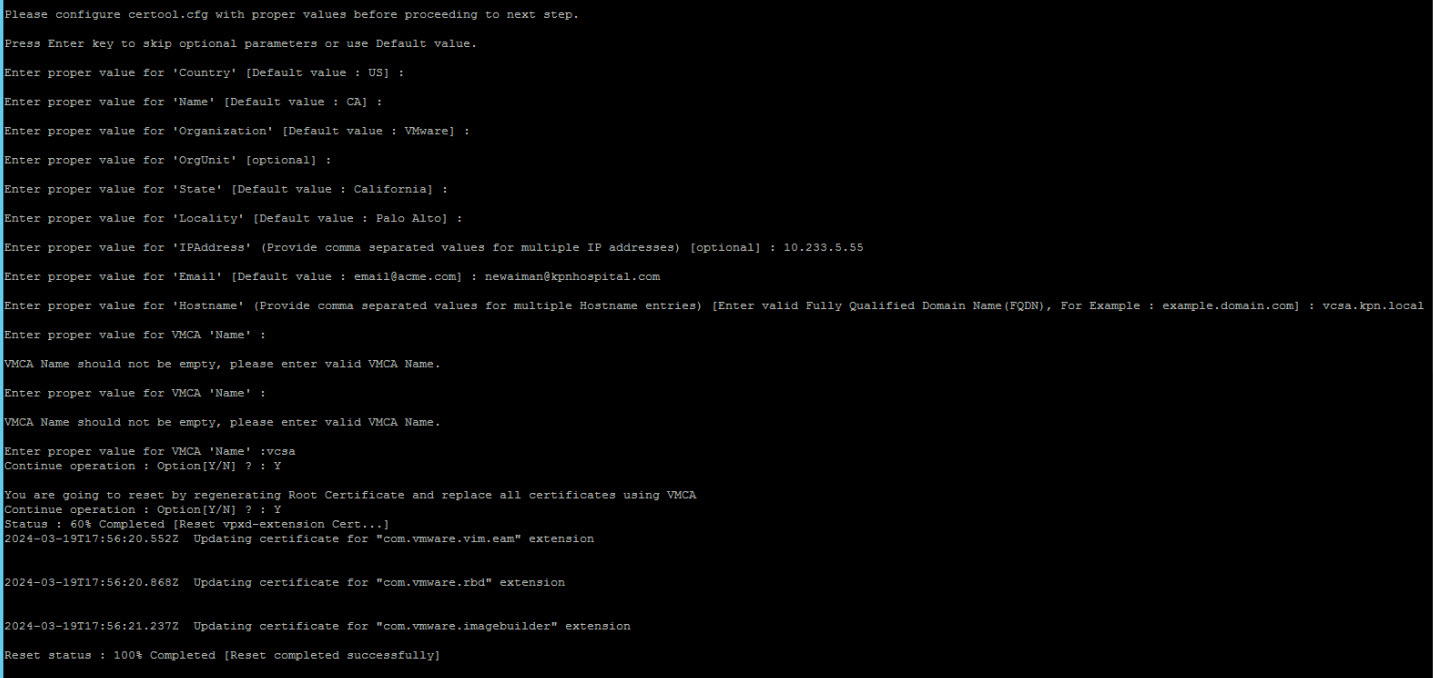
5. จากนั้นให้เรากรอกข้อมูลเพื่อทำการ re-sign certificates

6. เมื่อ complete 100% แล้ว ให้ reboot vcenter server 1 ครั้ง


#vcsa #vcenter500error


source : https://vmkfix.blogspot.com/2023/03/http-status-500-internal-server-error.html
20
Cause Issue / Veeam : Restore ขึ้น job failed Error Unable to get block digest
« กระทู้ล่าสุด โดย newaiman เมื่อ ธันวาคม 20, 2023, 11:39:10 am »

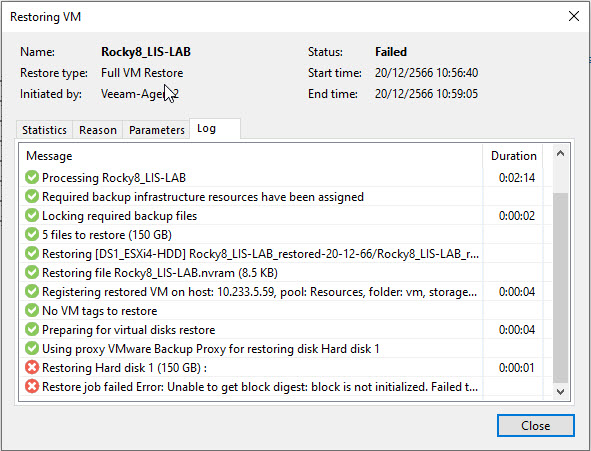
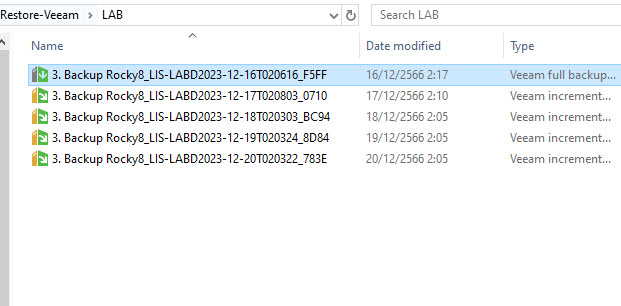
Case : เวลาเรา Restore veeam ที่เป็นไฟล์ .vbk (full) และไฟล์ .vib ที่ข้ามวัน เช่น ไฟล์ .vbk วันที่ 10/12/2566 และไฟล์ .vib วันที่ 12/12/2566 แต่ไม่มีไฟล์ .vib ของวันที่ 11/12/2566 จะทำให้เรา Restore ไปยัง Point ของไฟล์ .vib วันที่ 12/12/2566 ไม่ได้จะขึ้น "job failed Error Unable to get block digest"


How To Fix : ต้อง copy ไฟล์ .vib มาอยู่ในโฟล์เดอร์ที่เตรียม Restore ครบทุกวัน หรือ ทุกเวอร์ชั้น


#Veeam
หน้า: 1 [2] 3 4 ... 10