1
2
ระบบปฏิบัติการ Linux / [Debian] วิธีติดตั้ง Cockpit Dashboard บน Ubuntu Server 22.04
« กระทู้ล่าสุด โดย newaiman เมื่อ พฤศจิกายน 13, 2024, 10:22:33 am »โค๊ด: [Select]
sudo apt-get install cockpit -y
โค๊ด: [Select]
sudo systemctl enable --now cockpit.socket
source : https://www.techrepublic.com/article/install-cockpit-ubuntu-better-server/
3
ระบบปฏิบัติการ Linux / [RHEL8][CentOS8] วิธีการเพิ่ม Repo ของ Linux CentOS8 ทดแทนลิงค์เดิม
« กระทู้ล่าสุด โดย newaiman เมื่อ พฤศจิกายน 11, 2024, 10:23:21 pm »ปัจจุบัน Linux CentOS8 ได้หยุดการ Support แล้ว ทำให้เราไม่สามารถอัปเดตผ่าน yum repo ได้
วิธีเพิ่ม repo อื่น ทดแทน
โค๊ด: [Select]
sudo sed -i -e "s|mirrorlist=|#mirrorlist=|g" /etc/yum.repos.d/CentOS-*
โค๊ด: [Select]
sudo sed -i -e "s|#baseurl=http://mirror.centos.org|baseurl=http://vault.centos.org|g" /etc/yum.repos.d/CentOS-*
โค๊ด: [Select]
sudo dnf update
โค๊ด: [Select]
sudo dnf install centos-release-stream
โค๊ด: [Select]
sudo dnf swap centos-{linux,stream}-repos
โค๊ด: [Select]
sudo dnf distro-sync
โค๊ด: [Select]
sudo reboot
4
ระบบปฏิบัติการ Linux / [RHEL8][CentOS8] วิธีการติดตั้งโปรแกรม ClamAV Antivirus บน Cent8/AlmaLinux/Rocky
« กระทู้ล่าสุด โดย newaiman เมื่อ พฤศจิกายน 11, 2024, 05:09:03 pm »วิธีการติดตั้งโปรแกรม ClamAV Antivirus บน CentOS8,9 AlmaLinux8,9 และ Rocky Linux 8,9
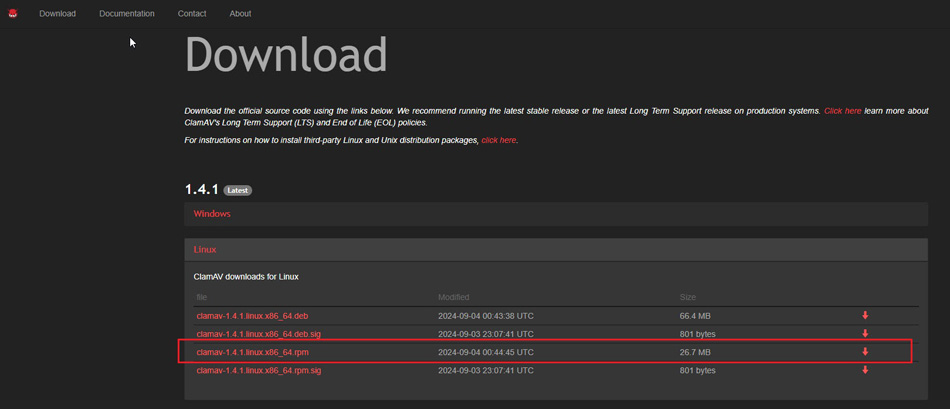
1. ดาวน์โหลดหรือคัดลอกลิงค์ไฟล์ Package .rpm จาก https://www.clamav.net/downloads
- เลือก Package สำหรับ Linx ชื่อไฟล์ "clamav-1.4.1.linux.x86_64.rpm"
2. Login เข้า Server ที่ต้องการติดตั้ง แล้วดาวน์โหลดไฟล์ "clamav-1.4.1.linux.x86_64.rpm" ผ่านคำสั่ง wget ไฟล์ rpm จากเว็บ https://www.clamav.net/downloads
3. ใช้คำสั่ง rpm เพื่อติดตั้ง Package clamav "clamav-1.4.1.linux.x86_64.rpm" ตามแต่เวอร์ชั่น
4. ใช้คำสั่ง ด้านล่างเพื่อตรวจสอบการติดตั้ง
1. ดาวน์โหลดหรือคัดลอกลิงค์ไฟล์ Package .rpm จาก https://www.clamav.net/downloads
- เลือก Package สำหรับ Linx ชื่อไฟล์ "clamav-1.4.1.linux.x86_64.rpm"
2. Login เข้า Server ที่ต้องการติดตั้ง แล้วดาวน์โหลดไฟล์ "clamav-1.4.1.linux.x86_64.rpm" ผ่านคำสั่ง wget ไฟล์ rpm จากเว็บ https://www.clamav.net/downloads
3. ใช้คำสั่ง rpm เพื่อติดตั้ง Package clamav "clamav-1.4.1.linux.x86_64.rpm" ตามแต่เวอร์ชั่น
โค๊ด: [Select]
rpm -Uvh --nodeps --force clamav-1.4.1.linux.x86_64.rpm
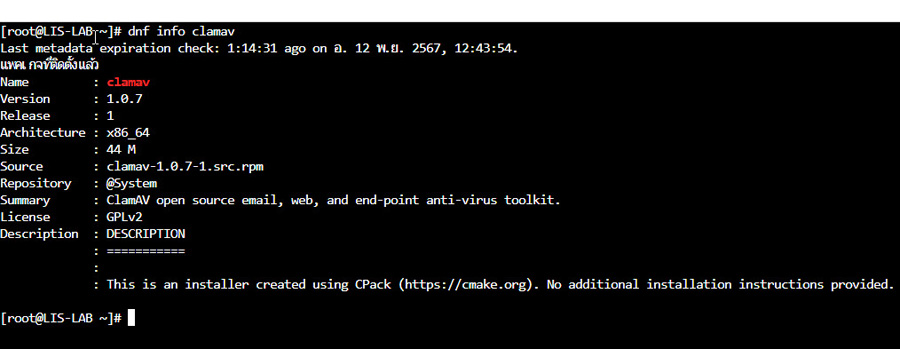
4. ใช้คำสั่ง ด้านล่างเพื่อตรวจสอบการติดตั้ง
โค๊ด: [Select]
dnf info clamav
5
Cause Issue / [HPE] รวมวิธีแก้ไข Server HPE Prolient DL180 Gen10
« กระทู้ล่าสุด โดย newaiman เมื่อ พฤศจิกายน 11, 2024, 04:58:32 pm »6
ระบบปฏิบัติการ Linux / [RHEL9] วิธีติดตั้ง PHP 8.0 on Rocky Linux9 and AlmaLinux9
« กระทู้ล่าสุด โดย newaiman เมื่อ พฤศจิกายน 11, 2024, 02:27:42 pm »7
เครื่องเสมือน : Virtual Machine & Containner / [Proxmox] วิธีเอา pop up Subscription” Notification Proxmox ออกเวลา Login
« กระทู้ล่าสุด โดย newaiman เมื่อ พฤศจิกายน 08, 2024, 08:28:35 pm »เราจะแก้ไขไฟล์ proxmoxlib.js โดยตำแหน่งที่ตั้งของไฟล์ "/usr/share/javascript/proxmox-widget-toolkit/proxmoxlib.js"
โค๊ด: [Select]
cd /usr/share/javascript/proxmox-widget-toolkit/
ทำการ สำรองไฟล์ ไฟล์ ไว้ก่อน
โค๊ด: [Select]
cp proxmoxlib.js proxmoxlib.js-bk
ทำการเปลี่ยนค่า
จาก
Change the following:
if (res === null || res === undefined || !res || res
.data.status.toLowerCase() !== ‘active’) {
เป็น
if (false) {
save and exit
ทำการ Resstart service
#systemctl restart pveproxy
ทดสอบ Login เข้าใหม่ มันจะไม่แสดง หน้า Error No Valid Subscription
8
เครื่องเสมือน : Virtual Machine & Containner / [Proxmox] อธิบายเกี่ยวกับ Network ของ Proxmox VE
« กระทู้ล่าสุด โดย newaiman เมื่อ พฤศจิกายน 06, 2024, 10:37:20 pm »[Proxmox] คำศัพท์หรือคำอธิบายของ Proxmox VE
ด้าน Network
Linux Bridge คือ
Linux Bond คือ การมัดรวมหลายๆ interface เข้าด้วยกัน คล้ายๆ NIC Teamming บน windows หรือ Link Aggregation ซึ่งจะช่วยในการทำ Fault-tolerance และเพิ่ม Performance
คำสั่ง restart network
ด้าน Network
Linux Bridge คือ
Linux Bond คือ การมัดรวมหลายๆ interface เข้าด้วยกัน คล้ายๆ NIC Teamming บน windows หรือ Link Aggregation ซึ่งจะช่วยในการทำ Fault-tolerance และเพิ่ม Performance
คำสั่ง restart network
โค๊ด: [Select]
systemctl restart networking.service
9
เครื่องเสมือน : Virtual Machine & Containner / [Proxmox] รวมคำสั่งต่างๆ Proxmox VE ที่ใช้งานบ่อย
« กระทู้ล่าสุด โดย newaiman เมื่อ พฤศจิกายน 04, 2024, 07:58:17 pm »คำสั่งเกี่ยวกับ Disk Proxmox
คำสั่ง :
คำสั่ง :
คำสั่ง :
คำสั่ง :
คำสั่ง :
คำสั่ง :
คำสั่ง :
คำสั่ง :
คำสั่ง :
โค๊ด: [Select]
lsblk
อธิบาย : เป็นคำสั่งแสดงจำนวน disk บน proxmoxคำสั่ง :
โค๊ด: [Select]
df -hT
อธิบาย : เป็นคำสั่งแสดงจำนวน Partition บน proxmoxคำสั่ง :
โค๊ด: [Select]
vgs
อธิบาย : เป็นคำสั่งแสดง volume groupคำสั่ง :
โค๊ด: [Select]
pvs
คำสั่ง :
โค๊ด: [Select]
lvs
อธิบาย : เป็นคำสั่งแสดง logical volumeคำสั่ง :
โค๊ด: [Select]
pvcreate /dev/sdh
อธิบาย : เป็นคำสั่งสร้าง physical volume จาก disk ชื่อ sdh ซึ่งค้นหาชื่อโดยคำสั่ง = lsblkคำสั่ง :
โค๊ด: [Select]
vgextend LV3-Thin /dev/sdh
อธิบาย : เป็นคำสั่งขยาย disk ของ LV3-Thin จาก sdhคำสั่ง :
โค๊ด: [Select]
lvextend -l +100%Free LV3-Thin/LV3-Thin
อธิบาย : เป็นคำสั่งขยาย LV3-Thin ให้ 100% ของ disk ที่เหลือ10
ระบบปฏิบัติการ Linux / วิธีติดตั้ง Google authenticator บน Centos/Ubuntu
« กระทู้ล่าสุด โดย newaiman เมื่อ ตุลาคม 22, 2024, 07:13:08 pm »1. เพิ่ม the EPEL repo
2. ติดตั้ง Google Authenticator
3. ตั้งค่า Google Authen
4. หลังจากนั้นตั้งค่า ตามคำถาม
โค๊ด: [Select]
yum install https://dl.fedoraproject.org/pub/epel/epel-release-latest-7.noarch.rpm
2. ติดตั้ง Google Authenticator
โค๊ด: [Select]
yum install google-authenticator
สำหรับ cent osโค๊ด: [Select]
apt install libpam-google-authenticator
สำหรับ ubuntu3. ตั้งค่า Google Authen
โค๊ด: [Select]
google-authenticator
4. หลังจากนั้นตั้งค่า ตามคำถาม
อ้างถึง
Do you want authentication tokens to be time-based (y/n) y
Do you want me to update your "/root/.google_authenticator" file? (y/n) y
Do you want to disallow multiple uses of the same authentication token? This restricts you to one login about every 30s, but it increases your chances to notice or even prevent man-in-the-middle attacks (y/n) y
By default, a new token is generated every 30 seconds by the mobile app.
In order to compensate for possible time-skew between the client and the server,we allow an extra token before and after the current time. This allows for a time skew of up to 30 seconds between authentication server and client. If you experience problems with poor time synchronization, you can increase the window from its default size of 3 permitted codes (one previous code, the current code, the next code) to 17 permitted codes (the 8 previous codes, the current code, and the 8 next codes). This will permit for a time skew of up to 4 minutes between client and server.
Do you want to do so? (y/n) y
If the computer that you are logging into isn't hardened against brute-force login attempts, you can enable rate-limiting for the authentication module. By default, this limits attackers to no more than 3 login attempts every 30s.
Do you want to enable rate-limiting? (y/n) y